Sandstone Walk, with Paver Patio
The journey continues, from Yesterday
That mound is artificial. It was built for falls and streams and to add sense of enclosure to the seating area. More on this later.
The journey continues, from Yesterday
That mound is artificial. It was built for falls and streams and to add sense of enclosure to the seating area. More on this later.
In order to get this circle . . .
The contractor was trying to get some old foundation stone circled up to create a firepit for a backyard entertaining area. Previous times we would have used a quik-cut saw with a 12" or 14" circular blade. Which would have meant more handling of the stone. Flipping this way, flipping over, etc.
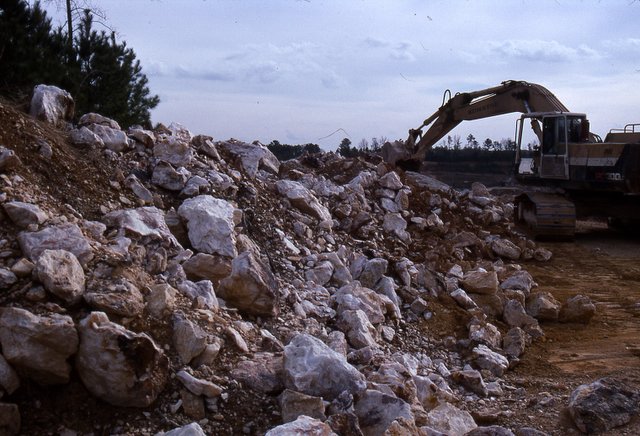
Before the quik-cut saw. A tremendous amount of hand work, a lot more labor intensive, chisels and hammers pounding away to split these blocks. Time moves on and the tools get better.
You need this saw
This is the latest and greatest in splitting stone with a high degree of accuracy. This water-fed chain saw has been available for awhile, but it has been cost prohibitive. Especially the blades/chain. Landscape contractors who invest in this technology improve their install work, increase labor time rates, and allow for a wider range of work because of this.
Rough boulder stone taken out of quarry piles can be easily edged/shaped/fitted to improve the quality of boulder wall work. I'd like to also mention this keeps the dust down when cutting sandstone which is of great benefit to the tool operator.
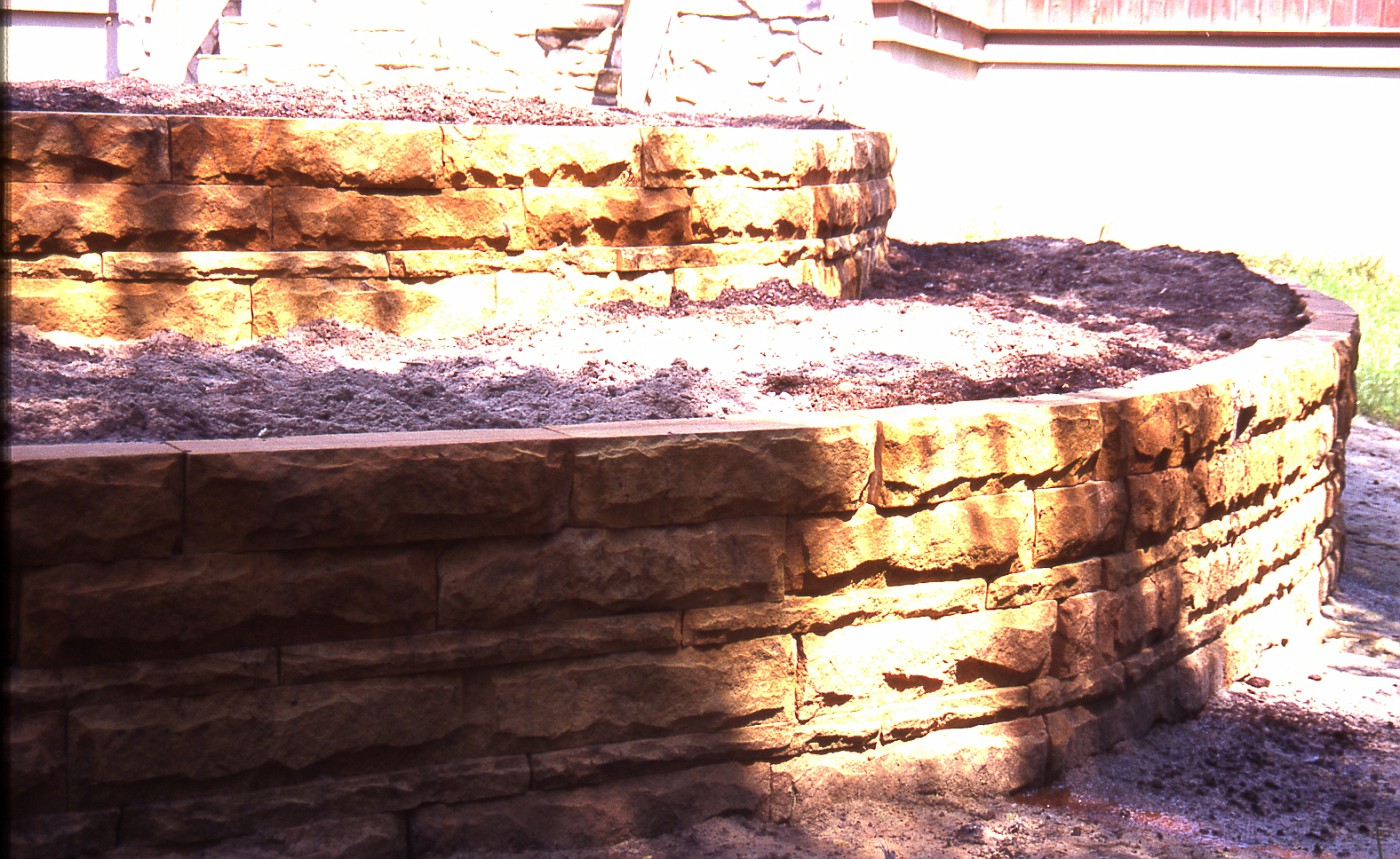
The two photos are from a job of mine installed back in the mid-90's in South Carolina. The stone is from Briar Hill a Stoneyard/Quarry in Central, Ohio.
I have always liked Briar Hill, and will always continue to try and find ways to use it on work I design. The wall stone comes in several different heights which allow for this kind of artistic feel when putting a wall together.
When I personally did this work I always rock-faced the bottom edge a little deeper to create a more interesting shadow line. Try that with modular concrete retaining wall block.
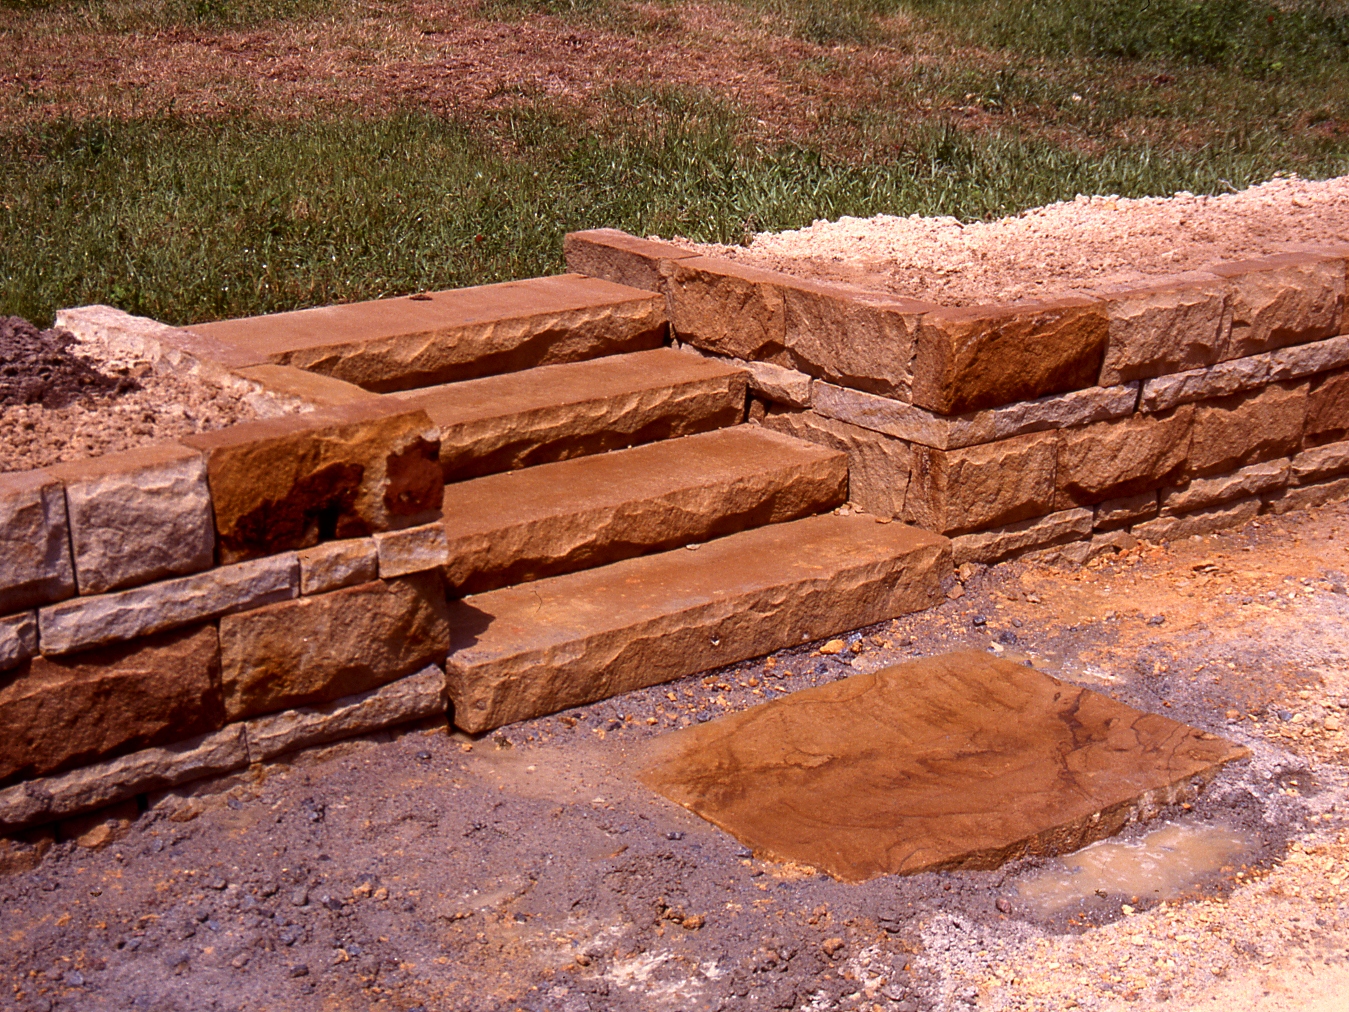
A comment on these steps; they are shipper 48" wide, 16" deep, and 6" high. Just about perfect for outdoor steps in just about any application. Now here's the great part . . . they lay up faster and easier than pouring concrete steps. I cannot think of any reason why these steps would ever be more expensive to install than concrete, and as for the look; well . . . you decide.
Theres one wall stone out of place in this photo, which did get fixed by the way. My other comment is the landing pad stone is a piece of whats called 3" offset.
The backside of these walls is typical construction, gravel, fabric, and pipe. Remembering the enemy of every wall ever made is water, and water pressure.

I posted about this project on Wednesday the 19th, and mentioned something about putting more photos online-well then go here if you have some time to kill.
There are images for the drawings I completed for the proposal and many shots of the job in action, including a traffic jam and the Fire Dept. hosing off quartzite.
What I wish I had were some night shots-someday. 
I have just put up what I am going to call a "project page" on my website. It concerns this sculptural piece that I named Ascension It is on a hillside going into a large city in South Carolina, and I had hoped it would look like whitewater tumbling off the hillside.
In the above photo you are looking at the quarry where the stone came from. A mica-schist for the outcroppings, big boulders, banks, etc. and a quartzite to represent the whitewater (lots of mineral deposits and flakes to make it shine --especially at night with lights).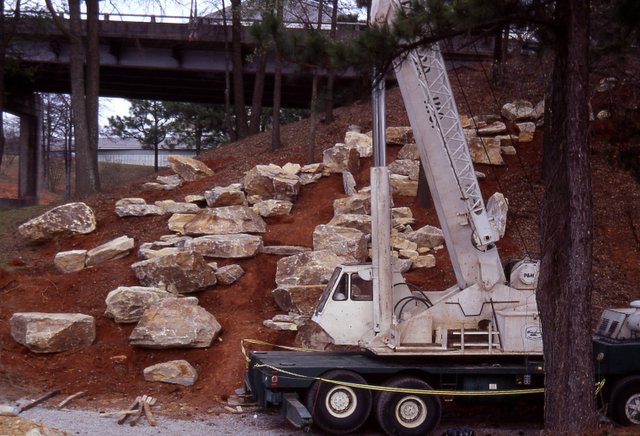
Right now I just have a lot of images up and am going to add a narrative in a day or two. Two things will always stand out from this project for me. One---it took 3 times as long to prep as it did to execute the installation of the project. Two--- it was a lot of fun, a lot of fun. I'd do it again, given the opportunity.
The above shot is the crane in action. We spent 2 full days just preparing the correct base for the crane and it's outriggers to stabilize on. It's good to be careful when moving boulders weighing as much as 13/14 ton.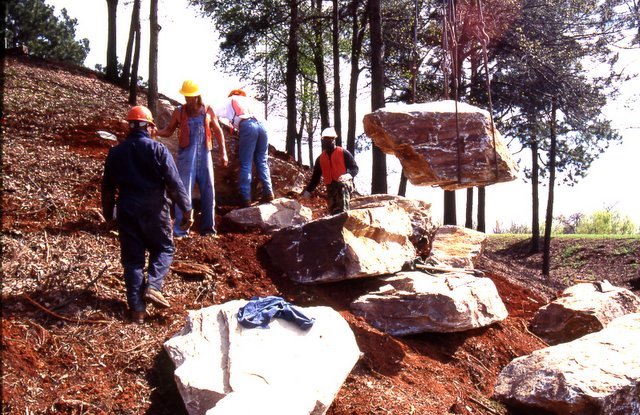
Placing boulders-this one probably weighs in under 2 and a half ton -- a mere lightweight. So safety at all times - which is really about being alert. While those guys are doing the final prep, the crane operator and I did a strange dance to communicate where and how I wanted the boulders placed.
The other nice thing about this was that it was not a pedestrian area so I had some latitude in placement. After all, my primary viewer was going by in cars at 40-55 mph making detail in placement a non-issue.
The city did a little bit of planting around the edges to soften the area, I would have liked to put in several hundred grasses but there was no budget for that sort of planting.
Final thoughts, it was a great challenge - especially logistically, but it was a lot of fun. I hope it brings a little bit of enjoyment to those that drive by everyday.
Ascension
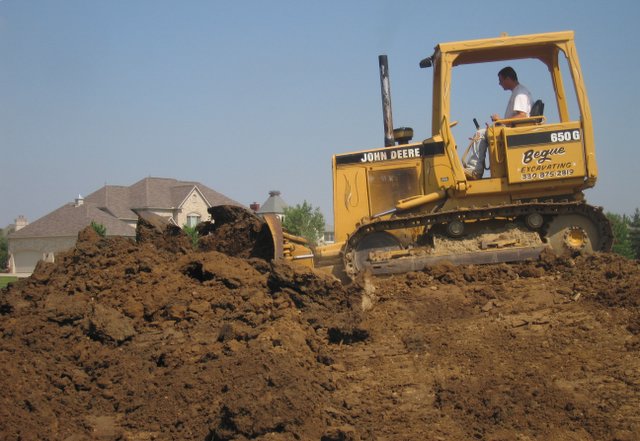 It's great to be able to get a dozer out on the site to move a lot of soil-quickly. Some of these operators are so skilled at moving soil, leveling off, prepping for drainage, etc. That when a job comes along where there are some rolling mounds involved and some interest in the topography-real interest. They are excited about the challenge(s) ahead.
 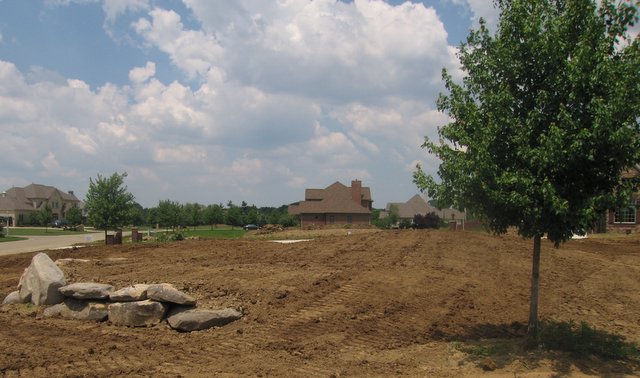 The key is to create the rolling interest and at the same time make sure the berms appear differently from other viewpoints. To remove an uniformity to the berm height, width, and depth. Also, none of this burial mound lookk where the whole length of the mound is same in height and width.
We also want to stay away from the cliche of planting trees directly on the top(s) of the mound, have no lawn roll onto or over the mound, and the sides be so steep they look totally out of place.
When the lawn starts to come in I will repost this shot and the new lawn shot together, to give you an idea how this came out.
 On Thursday afternoon we had it all going on in trying to create some rolling berms for a residential project. Too often we let the given state of terrain act as a given and do nothing to enhance the typography.
What makes higher end residential work more compelling is having the budget to allow for some sculpting of the soil to create a more interesting setting. Too often designers skip this possibility and just try and make the sight more interesting through hardscape and a lot (and I mean a lot) of plant material.
I gotta believe Designers are (A) either selling themselves short, or (B) not taking advantage of the ground plane-either by ignorance, lack of skill, or trepidation to think bigger.
When given the budget or opportunity----explore all the possibilities, all the dimensions of space you are working in, take chances to be more creative in the framework of the site you are working in. By framework I mean the berms need to be of a "certain: height to fit the scale of the project, and to not look like Civil War revetments, or Indian Burial Mounds. Lastly do not sculpt mounds for plants alone.
The plants only mounds are one of my great pet peeves, roll some grass up on that sucker!! play with the way the planting beds and lawn space interact. Think about how shadows will work across the berm(s).
My thanks to
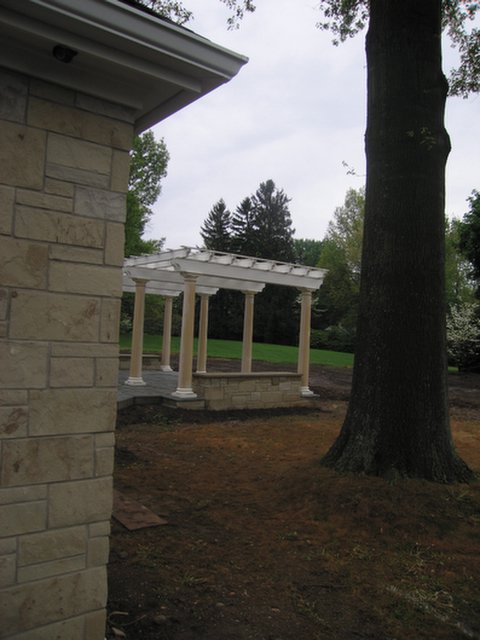
This isn't exactly what I was hoping the final pergola design would turn out to look like. I think the design of the overhead is fine, the color is fine, and the post work with the house.
My area of concern was the walls, planters, etc., do not tie in with the house, and there were going to be three ways to exit the patio. I was hoping to only get the one exit to have the observer taken along on a journey getting from the patio to the side entrance, and visa-versa. On this point I was given some latitude and it seems to be the way we are going to end up.
The architect has a lot of himself invested in the residence, and my conceptuals prompted him along to come up with some ideas to play off his house to come up with the final pergola design. The clients (who are going to live here) seemed very interested in the back and forth between all the design professionals, giving equal time to all points of view. I think they allowed all the design professional to do what they do best while at the same time imparting their wishes, and being respectful to the site we were working on.
Considering the size and scale of this job the architect and interior designer were both great to work with. Hats off to both of them. As the final plantings go in I will post more shots of this project to give you an idea how it all finishes out. The initial renderings were posted here last Spring.
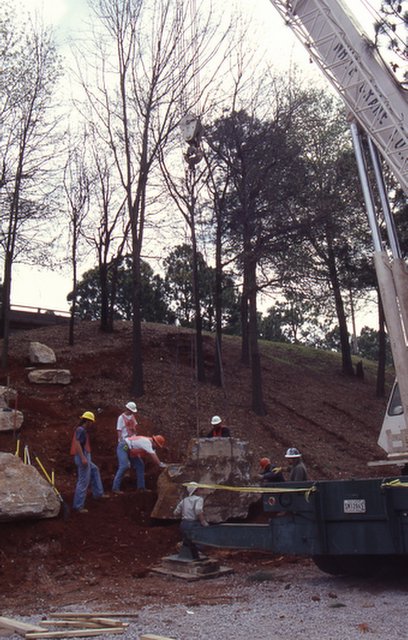 This is a shot of a 11 ton stone going into a sculptural piece I did a few years ago in Columbia, South Carolina. A mass-grouping of stones on a hillside to give the appearance of a waterfall.
This mica-schist stone was used as the outcropping and a quartzite was used for the "whitewater". Lights were added for a dramatic element that makes the work come alive in the evening.
This stone is critical because not onlt does it help anchor the right side of the falls, but will hold together visually the entire base of the project.
For a designer/builder the important thing to understand is the sequencing of events, and how critical that is to pull something like this off successfully.
I'm on the far right making sure this stone sits just right on it's base. The crane is rated 100 ton and had to be that large to move big stones way up the hillside. It will interest you to know the prep work and site preparation took as long to complete as the install. It took twice as long to select the stone at the quarry and figure out a good delivery procedure to get the stones in the order in which they were needed.